

Set-Up and Fine Tuning
Changing Strings
While we would like to leave this up to you, we generally recommend to change strings at least once a month if you play on a regular base. Don't wait until your strings break and fall off from old age before you change them. Worn, oxidized, pitted and dirty strings will not hold pitch, and they simply sound bad. When changing strings, we recommend that you remove and replace each string one at a time instead of all at once. This will prevent sudden and potentially damaging changes in neck tension (or if you do, it is a good idea to release the tension on your truss-rod). Each new string should be tuned up to correct pitch before the next one is removed. When tuning a brand-new string, always bring it up to pitch slowly. Otherwise, the rapid stretching may cause the string to break. The Magneto guitars are set up with a string gauge of 010 to 046, changing to different string gauge requires a whole new set-up of the guitar (Nut, Neck relief & Bridge), we advise to have this done by an experienced repair person or luthier.
TIP: Here is a simple trick that will turn any tuning machine into a locking tuner:
Pass the string through the hole of the tuner
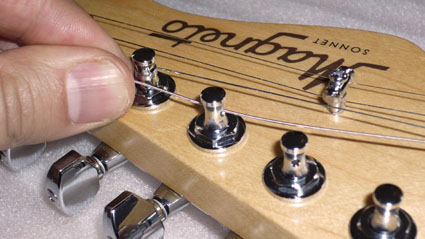
Run the short end halfway around the post (clockwise)
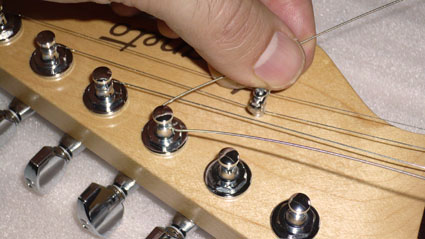
Then underneath and back over the main length of string before tightening.
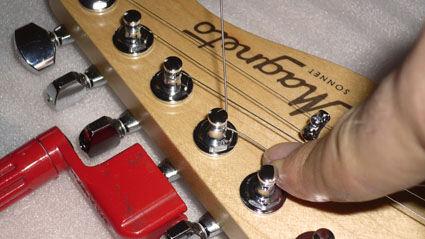
Tune your string to pitch, done!
A word on Intonation
At Magneto guitars we believe that the traditional building and fretting methods based on the equal tempered scale will give very good results in terms of intonation IF and only IF the guitar is build and set-up with great precision. We have developed our own methods of nut placement and intonation in order to provide you with the best possible and most pleasing tuning results. However, we recommend you to read the following chapters in order to get the most out of your instrument by learning to tune it properly using your years.
Tuning your guitar
While it is a simple task to tune a guitar when you have an electronic tuner on hand., we recommend that you learn to tune your guitar by ear with the help of a tuning fork. A lot of great luthiers tune the instruments using a high caliber strobe tuner first and then do the fine tuning using their ears. Learning to tune a guitar will train your ear and can help you to make more complicated intonation adjustments (as explained later).
Tuning can get very complicated and there basically is no such thing as "perfect tuning". One thing to remember is that the guitar construction is based on equal tempered scale and cannot be adjusted to play in "perfect tune" all over the neck when compared to a "stretch tuned" piano. However, if the guitar maker sets the nut and intonation properly and if the player tunes the instrument correctly, then all chords can sound pretty well in tune and will work well with other temperaments.
Before we get into tuning, we would like to start with one quite popular tuning method we advise not to use:
The 5th -7th fret harmonics method. Reason being that the 7th harmonic represents the pure fifth interval (where you need to consider the tempered fifth interval!). The difference is 2 cent which is little but this difference will expand from string to string. In general, use the 5th fret and the 12th fret harmonics for tuning purposes.
We recommend to use 2 or 3 different combined methods and check the final result:
The four-five method. The most popular tuning method:
- Tune your 1st high E string to a 440 tuning fork by playing the A note on the 5th fret and matching it to the tuning fork.
- Match the second string (B) at the fifth fret E to your open first string.
- Tune the third string at fourth fret B to the open second string.
- The fourth string at 5th fret shall match the open third string,
- Same goes for the fifth string fretted at 5th fret and 6th string fretted at 5th fret.
That method is pretty fast and simple but not precise enough, simply because small errors build up as you move forward. Therefore we recommend to check the octave-Harmonics method. Yet you can mix and match in order to find something that may be more convenient for you.
The 12th fret harmonics method. This is an easy method to remember and basically compares your notes fretted on the 7th and 8th frets to the 12th fret harmonics.
- Tune the 5th String (A String) to 440 Hz Pitch with a tuning fork.
- Tune the 6th String by comparing its 12th fret harmonic to the E tone at the 7th fret of the A String
- Tune the 4th String by comparing the A string's 12th fret harmonic to the fretted A note on the 7th fret of the D String.
- Tune the 3rd String by comparing the D string's 12th fret harmonic to the fretted D note on the 7th fret of the G String.
- Tune the 2nd String by comparing the G string's 12th fret harmonic to the fretted G note on the 8th fret of the B String.
- Tune the 1st String by comparing the B string's 12th fret harmonic to the fretted B note on the 7th fret of the high E String.
The octave-harmonics method. This method is a mix of various ways but consist of a double check on several strings, the goal being to harmonize all strings together and compare them to 1 and the same string.
1. Tune your 1st high E string to a 440 tuning fork by playing the A note on the fifth fret and matching it to the tuning fork, just as in previous method.
2. Then match the 6th string (low E) at its 5th fret harmonic to the open 1st hih E string, you should have the same tone, you can play both tones together and tune until you hear any beating.You can play the real note 2 octaves lower to check if it is pleasing enough.
3. Tune the 4th String (D-String) to the treble E String, compare the octave beween the 7th fret B note on the high E-String and the 9th fret B Note on the D-String. → now double check the low E 12th fret harmonic E matches the E note on fret 2 on the 4th String.
4. Tune the 3rd String (G String) to the in tune high E String by comparing the 10th fret D-Note on the E string to the 7th fret D-Note on the G String.→ Double check by playing the G note on the in Tune high E string's 3rd fret and compare it to the G string's 12th fret harmonic.
5. Tune the 2nd String (B String) by comparing the octave between the in tune 7th fret A note on the D-String to the 10th fret A note on the B String → Double check by comparing the B on the 7th fret of your in tune high E String to the 12th fret harmonic on your B-String.
6. Tune the 5th String (A String) by comparing the octave between the 7th fret E-Note on the A String to the In-Tune 9th fret E-Note on the G string.→ Double check by comparing the A note on the 5th fret of your in tune high E String to the 5th fret harmonic of your A string.
This method takes a bit longer and may sound complicated but has proven to be a winner in many situations.
Truss-Rod Adjustments
Minor Truss rod adjusment can have dramatic effects and improve your instrument's playability. The Magneto Quick-Set truss rod nut lets you adjust the neck relief in just a few minutes. However: uncorrect truss-rod adjustmnet can create serious and permanent damages to your guitar that will not be covered under the Magneto warranty. If you have experience, you can proceed to adjustments yourself, again, only if you feel a 100% confident.
The following steps will show you how to check and set the relief of your neck.
1. Place a capo or use your lefthand finger to press the low E string on first fret.
2. Press the low E string at the 17th frets using your right hand's pinky finger.
3. Check the clearance around 8th fret using your index finger, there should be just a little clearance of 0.2mm. Most of the time, you will not need to measure, there should be just a little space between the string and the frets. You can check by tapping the string to the fretboard (While holding the string on fret 1 and 17) and you should hear a little click.
4. If there is too much clearance, use the little pin that came with your guitar and insert it into the truss rod nut, gently turn the truss rod clockwise.
5. If there is too little or no clearance, you must turn the truss rod counter clockwise
Note: When operating truss-rod adjustments, start by moving the truss-rod nut slowly and in small steps.
Setting the Action and String Height
Once your truss rod has been adjusted properly, you can adjust the string height for optimal playabiity:
1. Measure the string height at the 12th fret (measured from top of the frets)
2. The low E string shall be at about 1.6mm and the high E shall be at 1.4mm
3. Adjust all middle strings with respect of the fingerboard radius (280mm/ 11")
These are factory settings but the ideal set-up of a guitar can vary from one player to another. Also, if you wanna go for alower action you will be faced with string buzz problems.
At Magneto Guitars, we set the action quite low. String buzz can occur when you hit the strings harder. String height and string buzz are a matter of taste and should be set according to each guitarist's taste.
If you want to avoid any kind of string buzz, you shall set the action higher and consider the 2mm height at the 12th fret.
Checking for String Buzz
Basically you can create string-buzz on any guitar by fretting uncorrectly. Also, this is a matter or personal taste, there are legendary guitar albums that were recorded where you can hear the buzz through your Hi-Fi speakers. That being said, Magneto Guitar necks are built and fretted with great precision. The string action measurements indicated in the upper paragraph are settings which get close to string buzz. Therefore, if your neck does move due to climatic or humidity changes, you may experience string buzz as a matter of fact.
Our method is simple, you have to check the guitar for string buzz by plugging it into an amplifier and by listening to the sound that comes out of the speakers. Play all strings on all frets.
In case it is too much string buzz for your taste, you need to set the string action higher by checking the neck relief and the height on the saddles OR bring the instrument to your Magneto dealer for service.
Setting the Intonation
The intonation of each Magneto guitar is set before leaving the workshop, this ensures best intonation all over the neck. However, in case this is not accurate anymore, you can correct this all by yourself:
Tune your guitar to pitch with an electronic tuner
Play the harmonic on the 12th fret and then play the fretted note at 12th fret.
>> If the fretted note is sharper, increase the string length at the string saddle
>> If the fretted note is flat, decrease the string length at the string saddle.
Repeat this on all the strings until all harmonics and fretted notes are the same.
Stretch Tuning
As mentioned in our tuning section, the "Perfect Tuning" is a matter that is still discussed by many experts.
However, since the piano keyboard's notes are still a reference to general tuning, the Piano tuners have developped a method called stretch tuning which basically streches the tuning of the notes by a few cents the further they go up in the octaves. Since the piano reaches over 7+ octaves and the guitar reaches over 4 octaves, the difference is much smaller. Yet there is a way to intonate your guitar by following that principle.
It actually is very simple and we can only advise to do this adjustment on the high E and B strings.
Use an electronic tuner and tune your open high E string to pitch.
Now by ear: Play your octave E at the 12th fret and compare it to the open E, do not use the harmonic.
Adjust your saddle so that the 12th fret E sounds exactly an octave higher by ear
Once it sounds to pitch to your ears, you can compare it with the tuner measurements and chances are that the high E measured by your ear will be sharper than the extact tuner's position.
If you noticed that you tuned your 12th fret E higher than the tuner, you may want to incorporate stretch tuning to your high E and B strings.
As mentioned earlier, this might be a point to some players and does mean nothing to others.
Pickup Height
The basic rule is to go as close as possible to the strings BUT you need to avoid to go too close as this can create magnetic pull. We advise to keep a distance of 2.5 to 3mm between the pickup poles and the strings.
Humbuckers and P90 type pickups can go as close as you like, single coils however have a strong magnetic field (The magnet-rods are closer to the strings) and setting them too close to the strings will produce unwanted effects such as double tones etc...
IMPORTANT NOTE: All the above neck adjustments should be performed by an experienced luthier for best results, damages caused by forcing the truss rod or any other mishandling will not be covered by the warranty.